71 Features of an Evernote Note

Someone asked me the other day, “How is Evernote better than a Google Doc for collaboration?” I answered with 4 or 5 good reasons. However, I did not convince myself, despite knowing Evernote had at least 50 advantages. So I decided to do a deep dive on the Evernote Note. Not a comparison, just cover all the Evernote features.
The ever Note is seldom covered or talked about even though it is the most heavily used element of Evernote. The Note drives everything we do, it is the backbone to the Evernote platform. The Note is where we create our content for future consumption, and view it on the Evernote Web, desktop, mobile devices or 3rd party applications. I cover all 71 ways you can create, manipulate or leverage an Evernote Note. Here are 71 Features of Evernote Notes:
Evernote Note — Create A New Note
1. Create a New Evernote Note
Create a new Note in Evernote by clicking the “+ New Note button” at the top-center of the application window. The note will be created in the Evernote Notebook you are currently in. You can also click the drop-down to create a Note in another Notebook.
2. Edit an Evernote Note
Click in a Note to begin editing.
3. Double click a Note to open the Note in a separate window.
4. Deleting an Evernote Note
To delete a Note, highlight it in the Note List to select it, then hit the Delete key on your keyboard or click the trash can on the far right above your toolbar. The Note will be moved to your Trash, which is a Notebook.
Move And Copy Evernote Notes to Notebooks
All new Evernote Notes are saved to your Evernote default Notebook, unless you are in a specific Notebook, then the created Note will be saved to the Notebook you are currently in.
5. How To Move your Evernote Notes to Notebooks
- From the Sidebar, click Notes, your Note List will be displayed.
- Click on the note you want to move. The Note will be displayed in the Note Editor.
- Click on the Notebook drop-down in the upper-left corner. A list of all your notebooks will be displayed. Select the Notebook you want your Note to be moved to.
- Moving Notes to different Notebooks can be done from different places throughout Evernote including 6.) Right Clicking on Notes, 7.) selecting Note from the Menu bar and 8.) selecting multiple Notes at one time.
9. How To Copy Evernote Notes
You can copy your Evernote Notes to the same Notebook or a different Notebook in the same ways that you move your Notes including Right Clicking on Notes, selecting Note from the Menu bar and selecting multiple Notes at one time.
Tag Notes in Evernote
Tags in Evernote are similar to keywords as they improve search, provide context, and add dimension to your Notes. Popular Tags include categories, people, places, time, things and more. There is no limitation to how creative and the combinations you can use with tags.
10. How To Tag Your Evernote Notes
- In a Note, click in the add Tags field, to the left of the Notebook selector above the Format bar.
- Type the Tag you want to add. If you have the Tag previously created Evernote will auto-suggest as you type. If not, complete typing to add the tag.
- Click the tag you want to add or hit return to complete adding the Tag.
11. You can also create a new Tag from the Tag List:
In the Sidebar, click Tags and Click the + New Tag Button
Formatting Note Text
Format Evernote Note text with any of the formatting tools, same as a traditional word processor by accessing the format toolbar just above your Note.
Format your Evernote Notes in the following ways:
12. Font: Change the font, font size and font styles.
13. Layout: Align text or create bulleted and numbered lists.
14. Special Elements: Insert a Checkbox (For Todo lists), Tables or Horizontal rule (my absolute favorite Evernote feature of all time!).
15. You can access the full formatting menu from Menu > Format.
Remove Text Formatting From Evernote Notes
I find it is important to remove formatting from text when I copy from external sources, particularly the web, to maintain uniform, clean, readable notes in my Evernote. Evernote offers 3 ways to remove text formatting when pasting text into a Note — (remove bold, italics, sizes, and other rich text).
Here is how to remove formatting when pasting into an Evernote Note:
16. Paste as Plain Text: Select Edit > Paste As Plain Text. The pasted text will be pasted into your Note without any formatting.
17. Simplify Formatting: Select Format > Simplify Formatting. This will convert an entire Note into the default font size, font color, and line spacing you have set in your Evernote Preferences. The Note is will continue to be a rich text Note maintaining bold, italics, underline, hyperlinks, and bullet points.
18. Make Plain Text: Select Format > Make Plain Text to convert your Note into a plain text note. It will remove all text formatting.
Add Attachments to An Evernote Note
You can add most anything to an Evernote Note — Documents, pictures, audio, files, images, PDF’s. The only attachment type Evernote does not handle well is video.
The are a number of ways to add attachments to Evernote to create a new Evernote Note:
19. Drag a file to the Evernote application icon to create a new Note with that attachment.
20. Click File > Attach Files…
21. Drag a file of any kind into the body of an existing Evernote Note.
Click any of the 3 File attachment buttons in the Toolbar:
22. “Record Audio,”
23. “Take A Snapshot”
24. “Attach A File.”
You can also create the 25.) New Audio Note and A 26.) New FaceTime Camera Note from the File Menu.
Note*: There are limitations on per note attachment sizes — 25MB for Free users and 100MB for Premium users.
Evernote Reminders
Now that you have created a Note, you may want to be reminded of when to act on that Note. For example, You may have created a Note to Call Bob today at 4:00PM, or used the Web Clipper to create a Note for a restaurant you would like to make a reservation. However, the restaurant is not open till Tuesday at 11:00AM. Evernote Reminders are awesome at, well, reminding you your notes need action. No need to set a Todo in another task management application, Evernote has you covered.
27. How To set a Reminder for a note in Evernote:
- Click the Reminder icon to set a Reminder for any Evernote Note.
- Reminders show in a List at the top of your Note List. In the Reminder list, you can sort, re-order, and edit your Reminders.
- Add a due date to Reminders by clicking the “Add A Date” button. Then select a date and time for your Reminder.
28. You can re-order Reminders in your List by clicking and dragging your Reminders to a different order of your choice in the list.
29. Mark Reminders complete by clicking the checkbox field to the left of the Reminder in the list, or when the Note you want to mark complete is selected, to the left of the blue reminder clock, Hover your mouse where it indicates when the Reminder is due, it will switch to “Done.” Click to mark the Reminder Done.
30. Editing and Removing Evernote Reminders
- Click to highlight the Note you want to remove or edit the Reminder.
- Click the clock Blue Reminder clock icon at the top-right of the Note.
- Mark the Reminder as Done by clicking the “Mark as Done” button.
- Remove the Reminder by clicking the “Clear Reminder” button.
- Change the due date of the Reminder by clicking the “Change the Date” button.
31. Receiving Evernote Email Reminders
- If you would like, Evernote will send you an email on the day timed Reminders are due. Here is how to set it up:
- Evernote will prompt you the first time you create a Reminder with the option to enable email reminders; click Yes if you would like to receive Evernote email Reminders.
- If you would like to turn on email Reminders for certain Notebooks, or to disable email Reminders,
- Go to Evernote > Preferences. Click Reminders menu and select accordingly.
Mark Up This Note
32. A picture is worth a 1,000 words and Mark Up This Note brings a picture to your Noetes. It is a fast way to visually communicate how you feel about a Note. To get started click the icon, and then click the “Mark Up Entire Note As PDF” button.
Your Note is sent to the built in Skitch editor, Evernote’s super handy Screen Capture and stamping tool. A copy is made of your Note, and it is turned into a PDF for annotation.
Here, you can use Arrow stamps, draw lines, type big colorful letters and communicate exactly how you feel about a picture or a text Note. Once finished, click the “X” in the top left corner. You will return to the originating Notebook with a new Note, the original title plus “Annotated” on the end.
Supercharge Your Notes With Evernote Presentation Mode
I do all my research in Evernote and am tired of having to move and reformat all of my efforts into Keynote to present my findings. I am crazy in love with Evernote’s Presentation mode as it has simplified my life. If you take time and care to create your Evernote Notes from the start, this will save you hours.
33. How To Use Evernote’s Presentation Mode
You can select one Evernote Note or multiple Notes for Presentation Mode. If you are presenting one note, well, you are presenting just that note. You can move to other notes while in Presentation mode by keying the left and right arrow keys. If you want to present multiple Notes or limit your presentation to a particular set of Notes, Highlight the range of notes first.
Let’s get the party, I mean Presentation started:
- Click the icon or CMD-Enter to launch Presentation Mode. CMD-OPT-Enter will launch Presentation Mode on a secondary display.
- You are now in full screen mode viewing your note. The neat feature is your mouse is a laser pointer with 3 colors to choose from, or the boring mouse arrow. You can change the colors with the keyboard shortcut CTRL-P.
- I like the night mode myself, I think my Notes stand out. However, you may prefer a white background which is available with a toggle by hitting CTRL-N.
- Presentation mode displays Notes in full screen mode. If you have attachments in your presentation, click the attachment to view them in full screen mode too. To exit the attachment view, hit Esc and you will continue viewing in full Presentation mode. Hit Esq. again to exit Presentation mode.
- Not enough, there is more! Multi monitor view, allows one screen for the presentation while the other monitor can be left to regular Evernote view to take notes, update the Evernote Note you are presenting in real-time as the group provides feedback on your presentation.
Share An Evernote Note
Sharing Evernote Notes creates many efficiencies. No need to add attachments to emails or copy and paste Evernote Note contents into an email. Evernote can Share notes in the following ways by clicking the share button above the toolbar on the right:
34. Post to Facebook
35. Post To Twitter
36. Post to Linkedin
37. Email Note
38. Copy Share Note URL to Clipboard
I believe the first 4 are self explanatory.
Share URL for an Evernote Note is a Public link and needs a bit more explanation and definition. When you share a public link, or URL, for an Evernote Note with anyone, the person or persons who click the public URL for that note will always see the latest text, attachments, and other contents. If the recipient(s) is an Evernote user, he or she can save a copy of that note to his or her Evernote account.
Why would you want to Share an Evernote Note (URL)
- Collaboration — emailing colleagues a Note you for a project or file you will be revising frequently.
- Social Proof — post a link to show off some work you have done.
- Large Attachments — email out the link to a Note instead of attaching large attachments.
- Control — You can stop sharing a Note at any time to prevent unauthorized use of your materials.
Note*: A URL shared can be re-shared with others and content from a Note can be copied from your note to an external source, so share your Evernote Notes wisely.
Evernote Note Info or Details
Evernote provides a lot of information about a Note, most of which is editable. To access your Note Info, click the icon on the far right of a note above the toolbar.
39. Location details
40. Note Title
41. Notebook that the Note is in — and you can change the Notebook here
42. Tags for the Note — Add or delete Tags here
43. Note created date — You can modify this date to the past or future; used to sort your notes.
44. Note updated date — You can modify this date to the past or future; used to sort your notes.
45. URL for the Note — filled in automatically by the Web Clipper
46. Location — where the Note was created
47. Sync Status
48. Attachment Status — What attachments are attached to the Note, do they need to be indexed and are their any errors indexing.
49. Size of the Note — Here you get Note size — 11KB, # of Words for the Note and # of Characters for the Note.
50. Author of the Note
51. History (Evernote Premium feature) Premium users can view prior versions of Notes with the Note History feature. A note that has been modified more than a few hours after it was created will have more than one revision available on Evernote Web. If you believe you have made an error editing a Note, corrupted a Note or believe an older version of a Note will be more useful, you can restore an older version of a Note via Note History. This has saved my butt more than a few times!
View Your Evernote Notes
When Evernote creates a feature they typically like to offer at least 3 ways to access it. When they created ways to view Evernote Notes, they came up with 5. I am sure there is a scientific reason behind the development of each view. For best results, I would recommend clicking through each of the 5 Note view options till you find the one that makes you the most productive. You can click this little icon which will move about based on your Note view, or scroll through the Note views under View:
52. Card View
53. Expanded Card View
54. Snippet View
55. Side List View
56. Top List View
Evernote Note Links
One of the most powerful features in Evernote is the ability to link one Note to another Note. Linking Notes creates organization and structure to your Evernote environment. There are 2 different types of Evernote links in Evernote, which causes quite a bit of confusion. Since this post is all about Notes, I am only going to discuss how to create and link Evernote Notes here.
57. How To Link Evernote Notes
- Right click on a Note and select “Copy Note Link.”
- Paste that link in a Note, where you want one click access to the Note, just like the web works. The link will look green like this.
Note*: (no pun intended) You can not change the name of the Note Link. The name of the link will be the note name.
Note Note*: (Pun intended) Evernote Note Links are only available in the Mac & Windows desktop version. You cannot create note links on the Evernote Web version.
Selecting Multiple Notes
Selecting Multiple Evernote Notes brings up an entirely new menu system; revealing more power and functionality hidden beneath the surface. Here is what you may have been missing.
Select 2 or more notes to reveal the following functions:
58. Email Evernote Notes:
Click the Email button > Fill in the email addresses to email the selected Evernote Notes.
59. Merge Evernote Notes:
On many occasions, you have multiple Evernote Notes you would like to combine into one Evernote note. Merging Notes keeps you organized and on task.
Here is how to Merge Evernote notes:
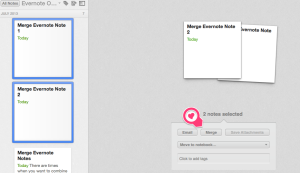
- Select any two or more notes you want to merge (you can be in any view.)
- Not sure how to select two or more notes? Hold down the command button on a mac, control button on a windows machine, or shift key to select a series of notes on either operating system. Click all the notes in Evernote you want to merge.
- A new screen will appear. In the middle there will be a button titled, Merge.
- Select Merge.
- You will have a nicely formatted note with a bar and the title separating each merged note.
59. Save Attachments From Evernote Notes
After highlighting multiple Notes, you have the option to “Save Attachments.” A very useful utility to quickly save all your attachments to your local machine. Click the “Save Attachments” button, choose the directory you want to save the attachments to and your done.
60. Create A Table of Contents Note
Earlier I described one of the most powerful features of Evernote, the ability to create links from one Evernote note to another. Expanding upon that foundation of linking Evernote notes is creating a Table of Contents (TOC) with 1 click. Here is how it works.
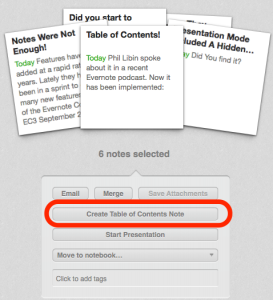
After you highlight the notes you want to make a Table Of Contents with, Click “Create A Table of Contents Note,” one new note will be created titled Table of Contents. Each note for the subject matter will have its link pasted into the Table of Contents for easy access and tidy organization. To this point it has always been a manual process of copying note links or 3rd party add apps.
Here is How To Create An Evernote Table of Contents — TOC
- Select two or more notes at the same time using the command or shift keys.
- Click “Create Table of Contents Note.”
- You are finished. A Table of Contents is created in the Evernote notebook where the 2 notes originated.
61. Start A Presentation Button — Which we covered earlier
62. Move to Notebook — Move your Note to another Evernote Notebook
63. Blank bar — That is an area to add tags, though it does not say it. Type in the blank area to add or delete tags according to your tagging strategy.
Convert Note To PDF
64. Right click inside a Note and you will have the option to Convert the Note to a PDF. Once clicked the original Note remains, a new Note is created as a PDF with the same title and (PDF) added to the end of the title.
How to Sort Your Evernote Notes
65. Evernote provides many different ways to sort and view your Evernote notes. You can be in any sub-section of Evernote to change the view of your Notes; Notebooks, Search, etc.
Windows
To sort your Notes in Evernote for Windows, click the Sort menu. This will display “Notes by Updated” by default. From here, you can sort your Notes by Title, Created, Updated, Size, and much more (similar to sorting in Outlook.)
Mac
Evernote for Mac works in a similar way. Clicking “Notes by Date Created” will show the list of potential sort criteria that you can select (similar to sorting in Outlook.)
You can change the fields that are displaying to sort by right clicking where it says “Created” or “Updated.”
Add Notes As A Shortcut
66. To add a Note as a Shortcut, drag and drop a Note on the Sidebar. (You can have up to 250 shortcuts.)
Recent Notes
67. The 5 most Recent Notes you have viewed are listed under Recent Notes, under the Shortcuts list in the Sidebar. It is convenient to access your Notes from the Recent list I refer to it all the time.
More Ways to Create Evernote Notes — The Elephant in the Menubar

68. Create a Quick Note (Mac OSX)
The Evernote Quick Note feature is available from anywhere in your computer by clicking the elephant in the menu bar at the top of your screen or using the keyboard shortcut Control-Command-N. Once you are done typing, click “Save to Evernote” or Command-Return to save it to your Default Notebook in Evernote.
69. Paste from Anywhere (Mac OSX)
Evernote has a global keyboard shortcuts for “Paste to Evernote” action. This means no matter what application is currently active, you can invoke the following keystroke — ⌘+⌃+V (default — you can change it in your Shortcuts tab in the preferences pane) or select “Paste to Evernote” option after clicking on the elephant in the menubar. This will copy the last copied clipboard item (using ⌃+C) and paste it into a new note in Evernote in your default notebook.
Evernote Web Clipper

70. Create Notes with the Evernote Web Clipper. Of course, the number one way to create a note is with Evernote’s most popular and import tool, the Evernote Web Clipper.
Sync Evernote Notes
71. After you have read this and created new Notes in Evernote, please do not forget there is no Save button in Evernote. You need to Sync your Notes with the Evernote servers so your Notes will be available on all the devices where you have Evernote installed.
Update November 3, 2013: I left out #72. Encrypting Text in Evernote Notes:
There are times when we all create sensitive information that we do not want others to see. This creates a “For Your Eyes Only” sharing environment among a larger group of individuals in a collaborative environment. Google Doc’s provides no extra security. Learn all about How to Encrypt your Evernote Note Text in my prior blog post covering the topic in depth.
Finally, if you would like a list of all the keyboard shortcuts for the listed features here, I created a list of Evernote Keyboard Shortcuts for both Windows & Mac — Infographic.
Please tell me, what is your favorite Evernote Note feature? Did you pick up anything new about Evernote Notes? Share in the comments below!